So let’s get started. I’ll be giving some fundamental tips and tactics for constructing a kilt here, so let’s get started.
How can you make a fantastic kilt or a classic tartan kilt?
Making a nice kilt or traditional tartan kilt is similar in that there isn’t much to do in terms of stitching. Although making a nice kilt or a traditional tartan kilt demands a lot of care and skill.
Step 1 ⁚ You must first obtain the measurements!
This is the first and most important stage in manufacturing a kilt, and it applies to both conventional and non-traditional kilts.
For the most part, you’ll need three measurements to make a basic kilt, which is as follows:
Waist\ Hips\ Length
To properly measure your model, please see our Kilt measurement guide here.
Step 2 ⁚ Get the Kilt Material Ready — Tartan in this case!
The authentic tartan fabric has a completed selvage edge that will be utilised as the kilt’s bottom (hem). If the material does not have a finished edge, begin hemming it at the top and bottom edge, making sure that the hem on both the top and bottom hedge matches the design when stitching. The cloth should then be cut into two strips that are wide enough to measure from the waist to the bottom of the hem. It will leave a lengthy central strip that will be used for the waistband in part. Then sew the two broad hemmed sections together
The top edge of the material should then be finished by serging, running a zigzag stitch, or using an anti-fraying spray.
Step 3 ⁚ Create an Apron
An apron is the front of the kilt that will be cinched up depending on the size. However, you must ensure that the tartan is properly centered. You should fold under at least 6 inches before beginning, and then construct a deep, double-width pleat on the left.
Then continue pleating with a single-width pleat until the safety pin at the hip is reached. Then, at the opposite end of the pleating, pin in a wide double sett width box pleat. The inside apron must now be measured to match the outer apron, and the end must be pinned back.
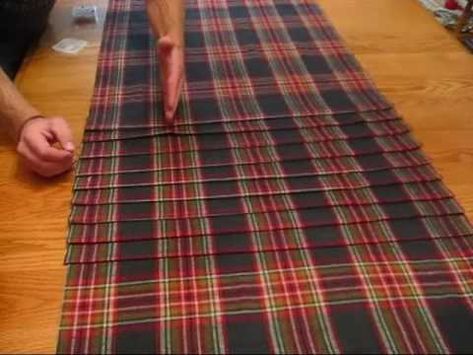
Step 4 ⁚ Making Pleats in the Kilt!
This is one of the most important aspects of producing a tartan kilt. As a result, you must do it correctly!
Each pleated part of the material should be 8 inches long (strictly), and the exposed part should be 5/8 to 1 inch long. To be precise, mark the one set on a piece of cardboard. The pattern of setts must then be divided into equal pieces.
A piece of two large colour strips with a narrow stripe in the middle looks best broken into three sections, with the strips centered in the middle area. A sett of 8 inches can also be divided into 8 or more portions. You can use the cardboard as a measurement instrument.
To repeat the process, place the pleat over the matching design in the next sett.
Step 5 ⁚ Waist to Hip Adjustment
You must keep the first and last pleats straight, which can be done using a dart. With the use of pins, it will adjust the apron for one-half of the waist/hip difference, and the other half should distribute evenly between the pleats.
You can also use a temporary marker to define the angles of the pleat modification to ensure straight stitching.
Step 6 ⁚ Pleat Basting
Basting should be done in two rows, 14 and 12 inches up from the bottom edge of the fabric. A running stitch can be used to capture the edge of a pleat because it compacts the cloth and makes it easier to deal with while sewing. It also makes steam pressing much easier.
Step 7 ⁚ Sewing the Pleats
Begin with a blind stitch at the bottom of the pleat and work your way up. Then, fasten the thread 12 inches from the reverse side of the pleat; start two stitches to fix the bottom, and then pass the needle under three threads of the bottom material before straightening up to the top of the pleat’s substance After that, run the needle down approximately 3 threads from the top material to the bottom. It creates around 10 stitches per inch.
Step 8 ⁚ Trimming the Pleats at the Back
Trim the excess fabric off the top of each pleat, from the waist to 1 inch above the hip line. This strip would be 1 12 to 2 inches deep, taking the majority of the material from within.
Step 9 ⁚ Add Fringes
The wide piece of material must be cut from the length of the kilt. Then fold this strip in half so that the fringes have double the thickness. It had to be sewed into a double edge folded in the right side of the apron now.
Step 10 ⁚ Putting on the Waistband
Now you must cut the 5-inch stripe for the waistband. You need to make sure that the pattern for the apron and the beginning of the waistband should match. Turn the bottom edge of the waistband stripe under 12 inch and use blind stitching to sew 1 to 12 inch from the top edge of the kilt apron. After that, fold the remaining width over the top of the kilt. This side will be hidden by the lining, so no finishing is required.
Step 11 ⁚ Inserting lining
Now, stitch in the lining of duck material at the top of the inner waistband by doing apron an overlap stitching along the top and inside the apron by bringing the bottom edge of the centre part to the rear of the pleats. You must ensure that the pleat’s depth is sewed down pleat. Another thing to remember is to leave the bottom of the apron lining loose by hemming turned under edge of the lining to itself.
Step 12 ⁚ Attach Buckles and Leather Straps
A few holes must be punched at the square end of the leather straps. After that, sew the straps to the inside of the garment, close to the fringe Following that, sew the straps to the inside of the next to the fringe, positioning the top straps just below the waistline and the other just above the bottom of the sewn down pleat. After that, tack the lining over the sewn-in straps. Now stitch the buckles on the pleated section, which is 2 inches to the right of the fringed size of the apron.
Step 13 ⁚ Inserting Velcro Into the Waistband
Instead of adding a third strap, utilise Velcro within the waistline to assist you keep the kilt in place with or without a belt.
Step 14 ⁚ Completion
You should take a moist cloth and push the pleats with it. To steam in pleats, hold the iron on each pleat and move to each pleat one at a time. Make careful to place a heavy object on each ironed pleat to help it settle.
A Beginner's Guide how to make a kilts Tartan kilts
Last modified: January 21, 2022